Mitigation Block: Khối giảm thiểu rủi ro của Smart Money
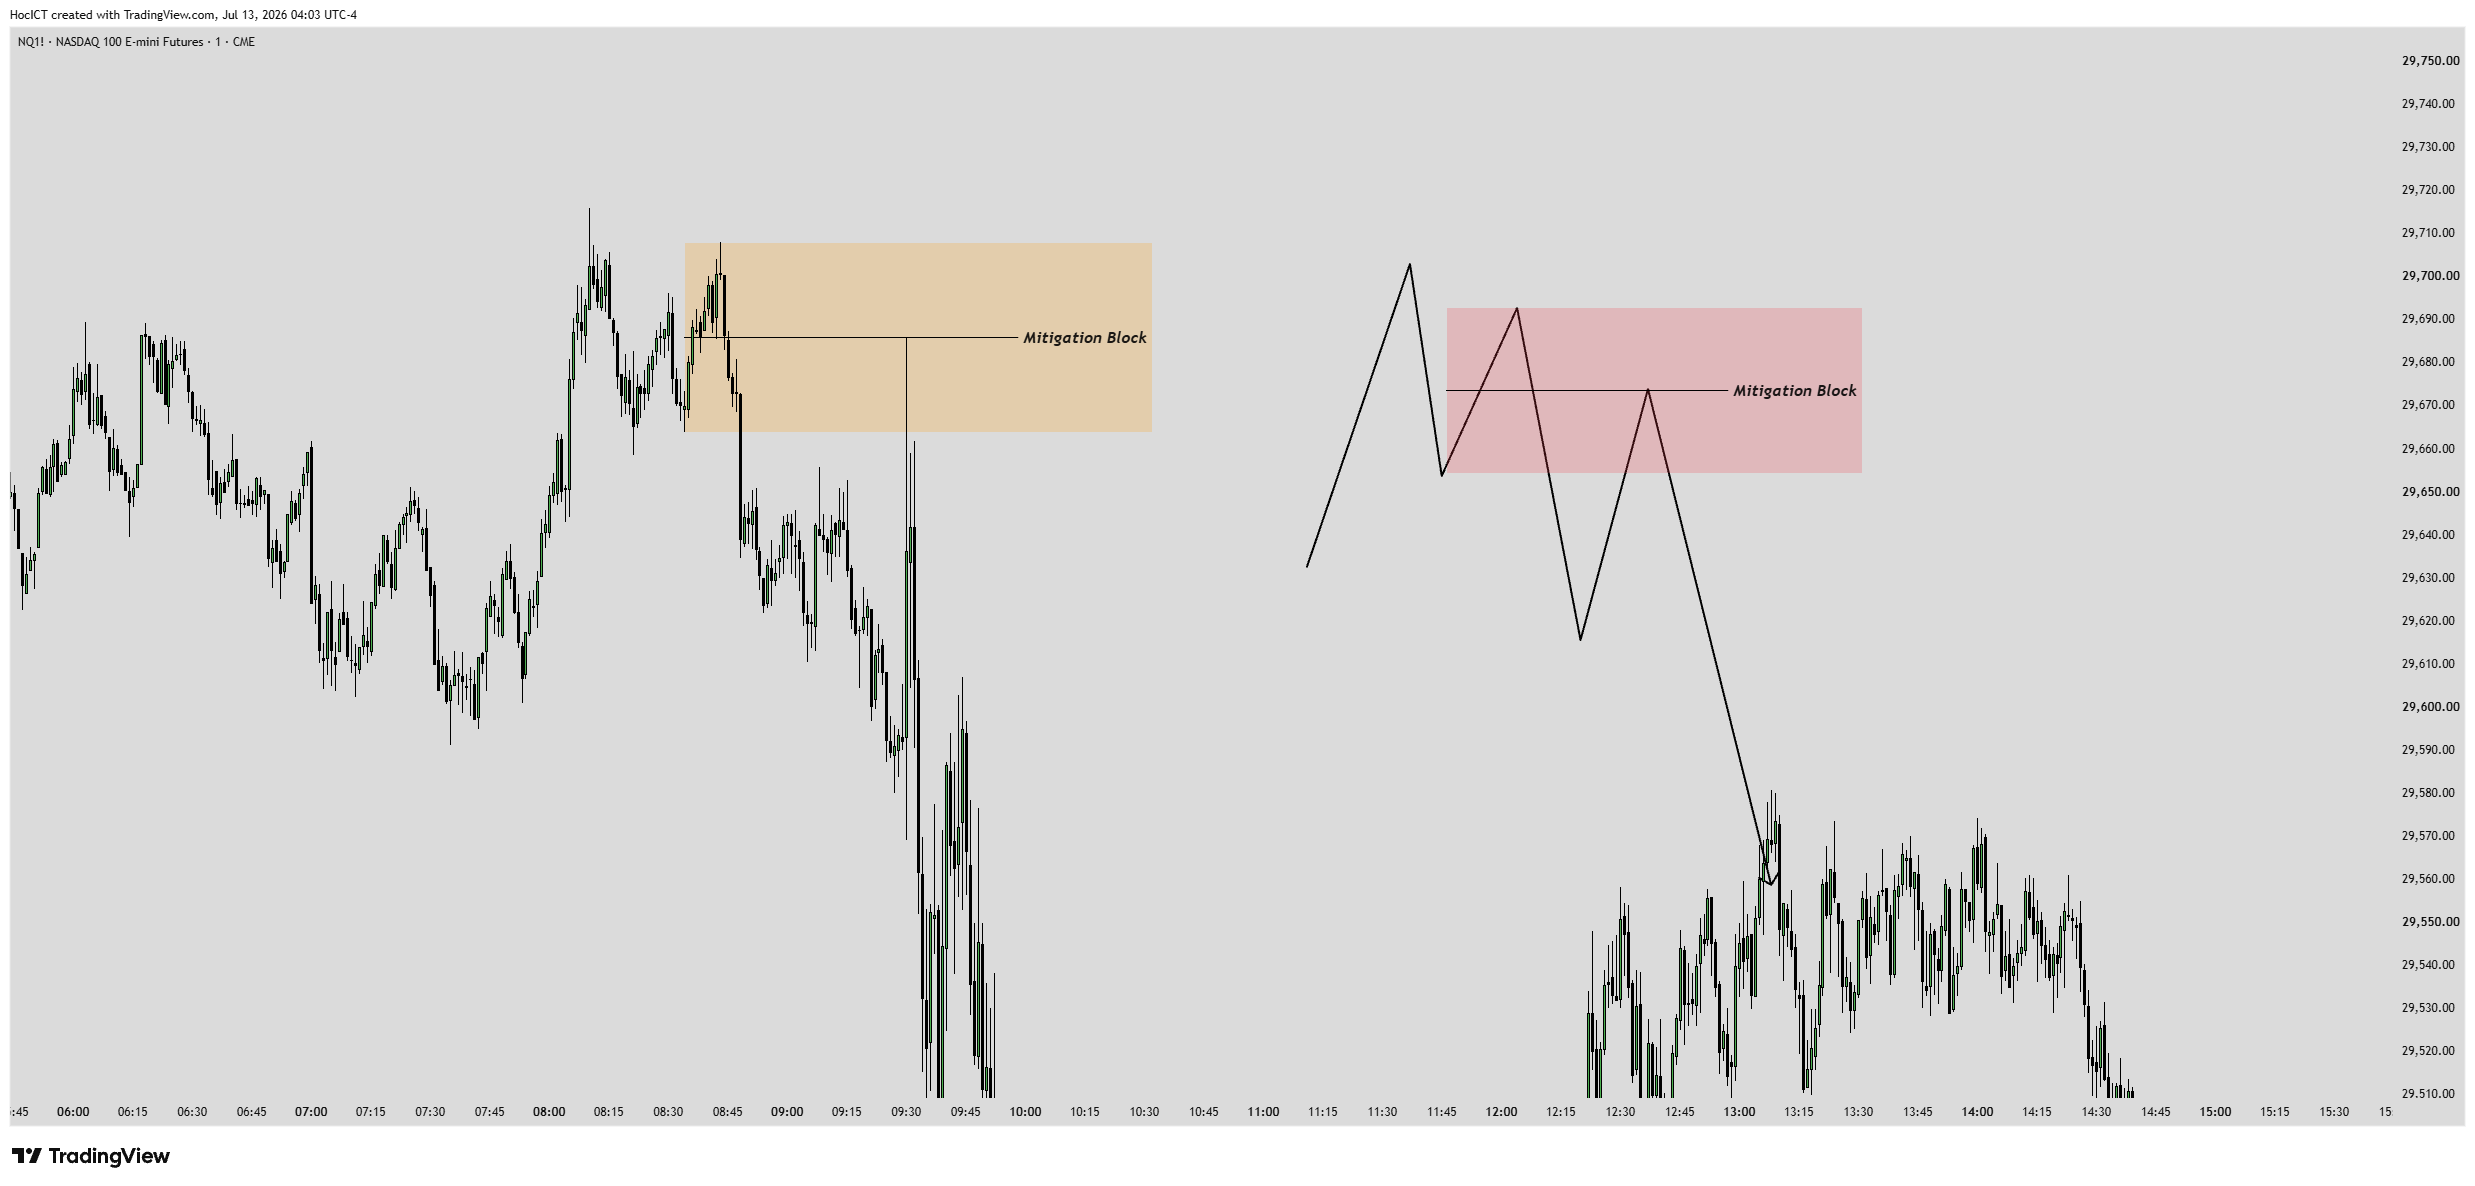
🔍 Mitigation Block Model: Exhaustion Mitigation Zone
Mitigation Block (MB) là một vùng giá trị có cấu trúc kỹ thuật rất tương đồng với Breaker Block. Tuy nhiên, điểm khác biệt sống còn là Mitigation Block được hình thành khi giá **không quét thanh khoản** (Failure Swing - thất bại trong việc tạo đỉnh cao hơn hoặc đáy thấp hơn).
1. Cơ Chế Cơ Bản Hình Thành Mitigation Block
Diễn biến tâm lý và dòng tiền trong một xu hướng tăng chuyển dịch sang giảm không có quét thanh khoản:
- Phe mua cố gắng đẩy giá lên tạo đỉnh 2 nhưng **thất bại trong việc vượt qua đỉnh 1** (Failure Swing), báo hiệu lực mua đã kiệt sức hoàn toàn.
- Giá giảm mạnh dứt khoát đâm thủng đáy trung gian (MSS).
- Lúc này, khối nến giảm cuối cùng tại vùng đáy trung gian bị xuyên phá trở thành **Mitigation Block**. Khi giá quay lại kiểm thử vùng này, Smart Money sẽ thoát nốt các lệnh mua cũ của họ ở mức hòa vốn hoặc lỗ nhẹ (Mitigate rủi ro) và kích hoạt thêm lệnh bán mới, đẩy giá sập mạnh.
📷 Hình 7.1: Cấu trúc Bearish Mitigation Block thực tế trên biểu đồ Nasdaq. Phe mua kiệt sức không quét nổi đỉnh cũ (Failure Swing) tạo đỉnh sau thấp hơn đỉnh trước, sau đó sập mạnh phá cấu trúc đáy gần nhất (MSS).
2. Bảng So Sánh Chi Tiết Breaker Block vs Mitigation Block
| Tiêu chí | Breaker Block (BB) | Mitigation Block (MB) |
|---|---|---|
| Hiện tượng quét thanh khoản | Có quét Stop Hunt (Tạo đỉnh cao hơn / đáy thấp hơn rồi mới đảo chiều). | Không quét (Failure Swing - tạo đỉnh thấp hơn / đáy cao hơn). |
| Tỷ lệ chiến thắng (Probability) | Rất cao (Do Smart Money đã rũ bỏ hoàn toàn phe nhỏ lẻ). | Trung bình - Khá (Cần kết hợp FVG và vùng cản HTF). |
| Đặc điểm nhận diện | Quét BSL/SSL ➔ MSS. | Failure Swing ➔ MSS. |
3. Quy Tắc Giao Dịch & Quản Trị Rủi Ro Với Mitigation Block
Do không có pha quét thanh khoản làm bệ đỡ dừng lỗ, giao dịch với Mitigation Block yêu cầu tính kỷ luật rất cao:
- Điểm cắt lỗ (Stop Loss - SL): Bắt buộc phải đặt dừng lỗ ngay phía sau đỉnh/đáy của Failure Swing (đỉnh/đáy thứ 2 - nơi phe đối diện thất bại trong việc đẩy giá tiếp).
- Điều kiện bổ sung: Chỉ nên giao dịch Mitigation Block nếu nhịp phá vỡ đáy cũ có động lượng Displacement rất mạnh và để lại một khoảng trống FVG lớn xếp chồng lên vùng MB. FVG này sẽ hoạt động như một lớp lọc bảo vệ bổ sung.
Trắc Nghiệm Kiến Thức: Mitigation Block: Khối giảm thiểu rủi ro của Smart Money
Trả lời 3 câu hỏi trắc nghiệm thực chiến để củng cố kiến thức vừa học.